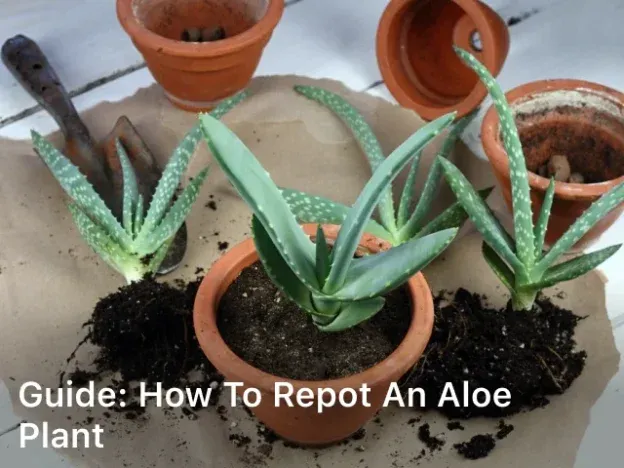
Guide: How to Repot an Aloe Plant – Learn how to repot an aloe plant successfully with expert tips and step-by-step instructions. Discover the secrets to a healthy and thriving aloe plant. Aloe plants are renowned for their unique beauty and exceptional healing properties. Repotting your aloe plant might seem like a daunting task, but it’s essential for its growth and well-being. In this comprehensive guide, we will walk you through the process of repotting your aloe plant successfully. Whether you’re a novice gardener or an experienced plant enthusiast, our expert tips and insights will ensure your aloe plant thrives in its new home. How to Repot an Aloe Plant Repotting an aloe plant can be broken down into several easy-to-follow steps. Here’s a detailed guide to ensure your aloe plant transplant goes smoothly. Step 1: Gather Your Supplies Before you begin, gather the following supplies: Aloe plant A larger pot with drainage holes Fresh cactus or succulent potting mix A trowel or scoop Gloves (optional but recommended) Step 2: Choose the Right Time The best time to repot your aloe plant is during its active growth phase, typically in the spring or early summer. This allows the plant to recover quickly. Step 3: Prepare the New Pot Select a new pot that is 1-2 inches larger in diameter than the current one. Ensure it has proper drainage to prevent overwatering. Fill the bottom with a layer of potting mix. Step 4: Remove the Aloe Plant Gently remove the aloe plant from its current pot. If it’s stubborn, tap the sides of the pot or use a trowel to loosen the soil. Be careful not to damage the roots. Step 5: Shake off Excess Soil Shake off the old soil from the roots, allowing them to breathe. Inspect the roots for any signs of rot or damage. Trim away any unhealthy roots with clean, sharp scissors. Step 6: Repot the Aloe Place the aloe plant in the center of the new pot. Fill the remaining space with fresh potting mix, ensuring the plant is at the same depth as before. Gently pat down the soil to secure the plant. Step 7: Water Sparingly Water the newly repotted aloe sparingly. Overwatering can lead to root rot. Allow the soil to dry out between watering sessions. Step 8: Place in Indirect Sunlight Put your aloe plant in a location with bright, indirect sunlight. Aloe plants thrive in such conditions. Step 9: Monitor and Care Continue to care for your aloe plant by providing adequate sunlight and watering it only when needed. Over time, you’ll see your plant flourish in its new home. How to repot an aloe plant in the ground Repotting an aloe plant into the ground is a straightforward process. Here are the steps to follow: Materials You’ll Need Aloe plant Shovel or garden trowel New planting location in the ground Well-draining soil (preferably sandy or cactus mix) Compost (optional) Water Mulch (optional) Steps Choose a Suitable Location: Select a planting location in your garden that receives plenty of sunlight. Aloe plants thrive in well-draining soil and prefer full to partial sun. Prepare the Hole: Dig a hole in the ground that is slightly larger than the root ball of your aloe plant. The hole should be deep enough to accommodate the root system comfortably. Ensure that the top of the root ball is level with the surrounding soil when placed in the hole. Amend the Soil: If your garden soil is heavy and doesn’t drain well, consider amending it with sand or a cactus/succulent potting mix to improve drainage. You can also mix in some compost to enrich the soil with nutrients. Aloe plants prefer slightly acidic to neutral soil. Remove the Aloe Plant from Its Pot: Gently remove the aloe plant from its current pot, taking care not to damage the roots. If the plant is root-bound, you can gently loosen the roots with your fingers. Place the Aloe in the Hole: Position the aloe plant in the center of the prepared hole, ensuring that it sits at the same depth it was in its original pot. Fill in the hole with soil, tamping it down gently to secure the plant in place. Water Thoroughly: After planting, water the aloe plant thoroughly. This helps settle the soil and ensures good root-to-soil contact. Allow the soil to drain; aloe plants do not like sitting in waterlogged soil. Mulch (Optional): Applying a layer of organic mulch, such as wood chips or straw, around the base of the aloe plant can help conserve moisture, suppress weeds, and regulate soil temperature. Leave some space between the mulch and the plant’s stem to prevent rot. Care: After repotting, continue caring for your aloe plant by providing it with appropriate sunlight, allowing the soil to dry out between waterings, and protecting it from extreme cold temperatures. Aloe plants are drought-tolerant and prefer to be slightly underwatered rather than overwatered. Monitor Growth: Your aloe plant should gradually adapt to its new outdoor environment and continue to grow. As it matures, it may produce offsets or “pups” that can be separated and planted in their own locations if desired. Repotting an aloe plant into the ground allows it to grow and thrive in a larger space, making it a beautiful addition to your garden landscape. Keep Reading : How to Add Calcium to Tomato Plants What Helps Plants Grow Faster How to Divide Snake Plant When should you repot an aloe plant? You should repot an aloe plant when it begins to outgrow its current pot or when you notice certain signs that indicate it’s time for a change. Here are some common reasons and guidelines for repotting an aloe plant: Overcrowding: If the aloe plant has become too large for its current pot and the roots are tightly packed, it’s time to repot it into a larger container. Aloe plants typically need to be repotted every 2-3 years or when they outgrow their pots.